一步两步是魔鬼的步伐

Duan1v's Blog

Go测试

单元测试

普通测试

规则

  • 测试文件以 _test.go 为后缀;测试函数以 Test 为前缀

实践

  • 新建main_test.go
 1
 2
 3
 4
 5
 6
 7
 8
 9
10
11
12
13
14
15
16
17
18
19
20
21
22
23
24
25
26
27
28
29
30
31
32
33
34
35
36
37
38
39
40
41
42
43
44
45
46
47
48
49
50
package main

import (
	"fmt"
	"math/rand"
	"testing"
	"time"
)

func FbnqDp(n int) (s int) {
	dp := make([]int, n+1)
	dp[1] = 1

	for i := 2; i < n+1; i++ {
		dp[i] = dp[i-2] + dp[i-1]
	}

	return dp[n]
}

func Fbnq(n int) (s int) {
	if n <= 2 {
		return 1
	}
	return Fbnq(n-1) + Fbnq(n-2)
}

func TestFbnqDp(t *testing.T) {
	type args struct {
		n int
	}
	type fbnqDpTest struct {
		name  string
		args  args
		wantS int
	}
	tests := []fbnqDpTest{}
	rand.Seed(time.Now().Unix())
	for i := 0; i < 10; i++ {
		x := rand.Intn(30) + 1
		tests = append(tests, fbnqDpTest{name: fmt.Sprintf("TestFbnqDp(%d)", x), args: args{n: x}, wantS: Fbnq(x)})
	}
	for _, tt := range tests {
		t.Run(tt.name, func(t *testing.T) {
			if gotS := FbnqDp(tt.args.n); gotS != tt.wantS {
				t.Errorf("FbnqDp() = %v, want %v", gotS, tt.wantS)
			}
		})
	}
}
  • 执行测试
 1
 2
 3
 4
 5
 6
 7
 8
 9
10
11
12
13
14
15
16
17
18
19
20
21
22
23
24
25
➜  p3 go test -gcflags=all=-l  -v main_test.go                
=== RUN   TestFbnqDp
=== RUN   TestFbnqDp/TestFbnqDp(6)
=== RUN   TestFbnqDp/TestFbnqDp(2)
=== RUN   TestFbnqDp/TestFbnqDp(8)
=== RUN   TestFbnqDp/TestFbnqDp(1)
=== RUN   TestFbnqDp/TestFbnqDp(27)
=== RUN   TestFbnqDp/TestFbnqDp(22)
=== RUN   TestFbnqDp/TestFbnqDp(26)
=== RUN   TestFbnqDp/TestFbnqDp(27)#01
=== RUN   TestFbnqDp/TestFbnqDp(19)
=== RUN   TestFbnqDp/TestFbnqDp(3)
--- PASS: TestFbnqDp (0.00s)
    --- PASS: TestFbnqDp/TestFbnqDp(6) (0.00s)
    --- PASS: TestFbnqDp/TestFbnqDp(2) (0.00s)
    --- PASS: TestFbnqDp/TestFbnqDp(8) (0.00s)
    --- PASS: TestFbnqDp/TestFbnqDp(1) (0.00s)
    --- PASS: TestFbnqDp/TestFbnqDp(27) (0.00s)
    --- PASS: TestFbnqDp/TestFbnqDp(22) (0.00s)
    --- PASS: TestFbnqDp/TestFbnqDp(26) (0.00s)
    --- PASS: TestFbnqDp/TestFbnqDp(27)#01 (0.00s)
    --- PASS: TestFbnqDp/TestFbnqDp(19) (0.00s)
    --- PASS: TestFbnqDp/TestFbnqDp(3) (0.00s)
PASS
ok      command-line-arguments  0.007s
  • 参数说明: -v 表示显示每个用例的测试结果; -gcflags=all=-l 表示禁止 内联 ,详见 Testing flags

  • 执行测试时,可以指定文件,比如上面的命令中,main_test.go;如果被测试函数不在该文件中,不能指定文件

基准测试

规则

  • 测试文件以 _test.go 为后缀;测试函数以 Benchmark 为前缀

实践

  • main_test.go添加代码
1
2
3
4
5
6
7
func BenchmarkFbnq(b *testing.B) {
	Fbnq(30)
}

func BenchmarkFbnqDp(b *testing.B) {
	FbnqDp(30)
}
  • 执行测试
 1
 2
 3
 4
 5
 6
 7
 8
 9
10
11
➜  p3 go test -bench Fbnq -v main_test.go
# ……
goos: linux
goarch: amd64
cpu: Intel(R) Core(TM) i5-6200U CPU @ 2.30GHz
BenchmarkFbnq
BenchmarkFbnq-4         1000000000               0.009437 ns/op
BenchmarkFbnqDp
BenchmarkFbnqDp-4       1000000000               0.0000027 ns/op
PASS
ok      command-line-arguments  0.052s
  • 常用参数: -benchtime=50x 表示单次测试函数执行次数,50次; -benchtime=5s 表示单次测试的时间为5s; -bench Fbnq 表示函数名称中含有 Fbnq-count=1 表示执行几次完整的测试; -benchmem 表示内存使用情况

net测试

  • 新建 net_test.go
 1
 2
 3
 4
 5
 6
 7
 8
 9
10
11
12
13
14
15
16
17
18
19
20
21
22
23
24
25
26
27
28
29
30
31
32
33
34
35
36
37
38
39
40
41
42
43
44
45
46
47
48
49
50
51
package main

import (
	"io/ioutil"
	"net"
	"net/http"
	"net/http/httptest"
	"testing"
)

func helloHandler(w http.ResponseWriter, r *http.Request) {
	w.Write([]byte("hello world"))
}

func handleError(t *testing.T, err error) {
	t.Helper()
	if err != nil {
		t.Fatal("failed", err)
	}
}

func TestConn(t *testing.T) {
	ln, err := net.Listen("tcp", "127.0.0.1:0")
	handleError(t, err)
	defer ln.Close()

	http.HandleFunc("/hello", helloHandler)
	go http.Serve(ln, nil)

	resp, err := http.Get("http://" + ln.Addr().String() + "/hello")
	handleError(t, err)

	defer resp.Body.Close()
	body, err := ioutil.ReadAll(resp.Body)
	handleError(t, err)

	if string(body) != "hello world" {
		t.Fatal("expected hello world, but got", string(body))
	}
}
func TestConn1(t *testing.T) {
	req := httptest.NewRequest("GET", "http://example.com/foo", nil)
	// 获取一个ResponseWriter,主要是为了测试 helloHandler 函数
	w := httptest.NewRecorder()
	helloHandler(w, req)
	bytes, _ := ioutil.ReadAll(w.Result().Body)

	if string(bytes) != "hello world" {
		t.Fatal("expected hello world, but got", string(bytes))
	}
}
  • 执行测试
1
2
3
4
5
6
7
➜  p14 go test -v net_test.go
=== RUN   TestConn
--- PASS: TestConn (0.00s)
=== RUN   TestConn1
--- PASS: TestConn1 (0.00s)
PASS
ok      command-line-arguments  0.005s

testify

安装

1
go get github.com/stretchr/testify

使用示例

 1
 2
 3
 4
 5
 6
 7
 8
 9
10
11
12
13
14
15
16
17
18
19
20
21
22
23
24
25
26
27
28
29
30
31
32
33
34
35
36
37
38
39
40
41
42
43
44
45
46
47
48
49
50
51
52
53
54
55
56
57
58
59
60
61
62
63
64
65
66
67
68
69
70
71
72
73
74
75
package main

import (
	"fmt"
	"testing"

	"github.com/stretchr/testify/assert"
	"github.com/stretchr/testify/suite"
)

type _Suite struct {
	suite.Suite
}

// SetupSuite() 和 TearDownSuite() 全局只会执行一次
// SetupTest() TearDownTest() BeforeTest() AfterTest() 对套件中的每个测试执行一次
func (s *_Suite) AfterTest(suiteName, testName string) {
	fmt.Printf("AferTest: suiteName=%s,testName=%s\n", suiteName, testName)
}

func (s *_Suite) BeforeTest(suiteName, testName string) {
	fmt.Printf("BeforeTest: suiteName=%s,testName=%s\n", suiteName, testName)
}

// SetupSuite() 仅执行一次
func (s *_Suite) SetupSuite() {
	fmt.Printf("SetupSuite() ...\n")
}

// TearDownSuite() 仅执行一次
func (s *_Suite) TearDownSuite() {
	fmt.Printf("TearDowmnSuite()...\n")
}

func (s *_Suite) SetupTest() {
	fmt.Printf("SetupTest()... \n")
}

func (s *_Suite) TearDownTest() {
	fmt.Printf("TearDownTest()... \n")
}
func FbnqDp(n int) (s int) {
	dp := make([]int, n+1)
	dp[1] = 1

	for i := 2; i < n+1; i++ {
		dp[i] = dp[i-2] + dp[i-1]
	}

	return dp[n]
}

func Fbnq(n int) (s int) {
	if n <= 2 {
		return 1
	}
	return Fbnq(n-1) + Fbnq(n-2)
}

func (s *_Suite) TestFbnq() {
	fmt.Printf("TestFbnq()... \n")
	ret := Fbnq(30)
	assert.Equal(s.T(), ret, 832040)
}

func (s *_Suite) TestFbnqDp() {
	fmt.Printf("TestFbnqDp()... \n")
	ret := FbnqDp(30)
	assert.Equal(s.T(), ret, 832040)
}

// 让 go test 执行测试
func TestAll(t *testing.T) {
	suite.Run(t, new(_Suite))
}
  • 执行测试
 1
 2
 3
 4
 5
 6
 7
 8
 9
10
11
12
13
14
15
16
17
18
19
20
21
➜  p15 go test -v tf_test.go -run TestAll
=== RUN   TestAll
SetupSuite() ...
=== RUN   TestAll/TestFbnq
SetupTest()... 
BeforeTest: suiteName=_Suite,testName=TestFbnq
TestFbnq()... 
AferTest: suiteName=_Suite,testName=TestFbnq
TearDownTest()... 
=== RUN   TestAll/TestFbnqDp
SetupTest()... 
BeforeTest: suiteName=_Suite,testName=TestFbnqDp
TestFbnqDp()... 
AferTest: suiteName=_Suite,testName=TestFbnqDp
TearDownTest()... 
TearDowmnSuite()...
--- PASS: TestAll (0.01s)
    --- PASS: TestAll/TestFbnq (0.01s)
    --- PASS: TestAll/TestFbnqDp (0.00s)
PASS
ok      command-line-arguments  0.013s

Ginkgo

安装

1
2
go install github.com/onsi/ginkgo/ginkgo
go get github.com/onsi/gomega/...

使用示例

  • 编写测试用例 books/books.go
 1
 2
 3
 4
 5
 6
 7
 8
 9
10
11
12
13
14
15
16
package books

type Book struct {
	Title  string
	Author string
	Pages  int
}

func (b *Book) CategoryByLength() string {

	if b.Pages >= 300 {
		return "NOVEL"
	}

	return "SHORT STORY"
}
  • 生成测试入口文件
1
2
3
4
5
6
7
➜  books ginkgo bootstrap                 
Generating ginkgo test suite bootstrap for books in:
        books_suite_test.go

Ginkgo 2.0 is coming soon!
==========================
# ……
  • 生成测试文件
1
2
3
4
5
6
7
8
  books ginkgo generate books
Generating ginkgo test for Books in:
  books_test.go


Ginkgo 2.0 is coming soon!
==========================
# ……
  • 编写测试文件
 1
 2
 3
 4
 5
 6
 7
 8
 9
10
11
12
13
14
15
16
17
18
19
20
21
22
23
24
25
26
27
28
29
30
31
32
33
34
35
36
37
38
39
40
41
42
43
package books_test

import (
	. "github.com/onsi/ginkgo"
	. "github.com/onsi/gomega"

	b "p15/books"
)

var _ = Describe("Book", func() {
	var (
		longBook  b.Book
		shortBook b.Book
	)

	BeforeEach(func() {
		longBook = b.Book{
			Title:  "Les Miserables",
			Author: "Victor Hugo",
			Pages:  1488,
		}

		shortBook = b.Book{
			Title:  "Fox In Socks",
			Author: "Dr. Seuss",
			Pages:  24,
		}
	})

	Describe("Categorizing book length", func() {
		Context("With more than 300 pages", func() {
			It("should be a novel", func() {
				Expect(longBook.CategoryByLength()).To(Equal("NOVEL"))
			})
		})

		Context("With fewer than 300 pages", func() {
			It("should be a short story", func() {
				Expect(shortBook.CategoryByLength()).To(Equal("SHORT STORY"))
			})
		})
	})
})
  • 执行测试
 1
 2
 3
 4
 5
 6
 7
 8
 9
10
11
12
13
➜  books go test -v p15/books/         
=== RUN   TestBooks
Running Suite: Books Suite
==========================
Random Seed: 1657256395
Will run 2 of 2 specs

••
Ran 2 of 2 Specs in 0.001 seconds
SUCCESS! -- 2 Passed | 0 Failed | 0 Pending | 0 Skipped
--- PASS: TestBooks (0.00s)
PASS
ok      p15/books       0.010s

mock测试

安装

1
go get -u github.com/golang/mock/gomock

使用示例

  • 测试用例: biz/user.go
 1
 2
 3
 4
 5
 6
 7
 8
 9
10
11
12
13
14
15
16
17
18
19
20
21
22
23
24
25
26
27
28
29
30
31
32
33
34
35
36
37
38
39
40
41
42
43
44
45
46
47
48
49
50
51
52
53
54
55
56
57
58
59
60
61
62
63
64
65
66
67
68
69
70
71
72
73
74
75
76
77
78
79
80
81
82
83
84
85
86
87
88
89
90
91
92
package biz

import (
	"gorm.io/driver/mysql"
	"gorm.io/gorm"
)

type User struct {
	ID       int64  `gorm:"primarykey"`
	Phone    string `gorm:"index:idx_phone;unique;type:varchar(11) comment '手机号码,用户唯一标识';not null"`
	Pwd      string `gorm:"type:varchar(100);not null "`
	Nickname string `gorm:"type:varchar(25) comment '用户昵称'"`
	Uname    string `gorm:"type:varchar(25) comment '用户名'"`
}

// 注意这一行新增的 mock 数据的命令 "p15/biz" 必须写全否则生成的测试文件引入包报错
//go:generate mockgen -destination=../mock/mrepo/user.go -package=mrepo "p15/biz" UserRepo
type UserRepo interface {
	CreateUser(*User) (*User, error)
	GetUserById(id int64) (*User, error)
}

type userRepo struct {
	db *gorm.DB
}

func NewUserRepo() *userRepo {
	mysqlSource := "dywily:q123456we@tcp(127.0.0.1:3306)/first?charset=utf8mb4&parseTime=True&loc=Local"
	db, err := gorm.Open(mysql.Open(mysqlSource), &gorm.Config{})

	if err != nil {
		panic("failed to connect database")
	}

	return &userRepo{db: db}
}

type UserUsecase struct {
	repo UserRepo
}

func NewUserUsecase(repo UserRepo) *UserUsecase {
	return &UserUsecase{repo: repo}
}

func (uc *UserUsecase) Create(u *User) (*User, error) {
	return uc.repo.CreateUser(u)
}

func (uc *UserUsecase) UserById(id int64) (*User, error) {
	return uc.repo.GetUserById(id)
}

func (r *userRepo) CreateUser(u *User) (*User, error) {
	var user User
	// 验证是否已经创建
	result := r.db.Where(&User{Phone: u.Phone}).First(&user)
	if result.RowsAffected == 1 {
		panic("用户已存在")
	}

	user.ID = u.ID
	user.Uname = u.Uname
	user.Phone = u.Phone
	user.Nickname = u.Nickname
	user.Pwd = u.Pwd
	res := r.db.Create(&user)
	if res.Error != nil {
		panic(res.Error.Error())
	}

	return &User{
		ID:       user.ID,
		Phone:    user.Phone,
		Pwd:      user.Pwd,
		Nickname: user.Nickname,
		Uname:    user.Uname,
	}, nil
}

func (r *userRepo) GetUserById(Id int64) (*User, error) {
	var user User
	result := r.db.Where(&User{ID: Id}).First(&user)
	if result.Error != nil {
		return nil, result.Error
	}

	if result.RowsAffected == 0 {
		panic("用户不存在")
	}
	return &user, nil
}
  • 生产mock文件
1
mockgen -destination=../mock/mrepo/user.go -package=mrepo "p15/biz" UserRepo

或者

https://static.duan1v.top/images/739b9926034d7e1172c6f6e0961a47d2.png
go-test
  • 编写测试文件 biz/biz_suite_test.go
 1
 2
 3
 4
 5
 6
 7
 8
 9
10
11
12
13
14
15
16
17
18
19
20
21
22
23
24
25
26
package biz_test

import (
	"testing"

	"github.com/golang/mock/gomock"
	. "github.com/onsi/ginkgo"
	. "github.com/onsi/gomega"
)

func TestBiz(t *testing.T) {
	RegisterFailHandler(Fail)
	RunSpecs(t, "biz user test")
}

var ctl *gomock.Controller
var cleaner func()

var _ = BeforeEach(func() {
	ctl = gomock.NewController(GinkgoT())
	cleaner = ctl.Finish
})
var _ = AfterEach(func() {
	// remove any mocks
	cleaner()
})
  • 编写测试文件 biz/user_test.go
 1
 2
 3
 4
 5
 6
 7
 8
 9
10
11
12
13
14
15
16
17
18
19
20
21
22
23
24
25
26
27
28
29
30
31
32
33
34
35
36
37
38
39
40
41
42
43
44
45
46
47
48
49
50
51
52
53
54
55
56
57
58
59
60
61
62
63
64
65
66
67
68
69
package biz_test

import (
	"p15/mock/mrepo"

	"p15/biz"

	"github.com/golang/mock/gomock"
	. "github.com/onsi/ginkgo"
	. "github.com/onsi/gomega"
)

var _ = Describe("UserUsecase", func() {
	var userCase *biz.UserUsecase
	var mUserRepo *mrepo.MockUserRepo
	info := &biz.User{}
	BeforeEach(func() {
		mUserRepo = mrepo.NewMockUserRepo(ctl)
		userCase = biz.NewUserUsecase(mUserRepo)
		info = &biz.User{
			ID:       3,
			Phone:    "15866547585",
			Pwd:      "admin123456",
			Nickname: "hahaha",
			Uname:    "hahaha",
		}
	})

	It("Create", func() {
		// 这里不会在数据库中创建
		mUserRepo.EXPECT().CreateUser(gomock.Any()).Return(info, nil)
		l, err := userCase.Create(info)
		Ω(err).ShouldNot(HaveOccurred())
		Ω(err).ToNot(HaveOccurred())
		Ω(l.ID).To(Equal(int64(3)))
		Ω(l.Phone).To(Equal("15866547585"))
	})

	It("UserById", func() {
		mUserRepo.EXPECT().GetUserById(gomock.Any()).Return(info, nil)
		user, err := userCase.UserById(3)
		Ω(err).ShouldNot(HaveOccurred())
		Ω(user.Phone).Should(Equal("15866547585"))
	})
})

var _ = Describe("User", func() {
	var ro biz.UserRepo
	var uD *biz.User
	BeforeEach(func() {
		ro = biz.NewUserRepo()
		uD = &biz.User{
			ID:       4,
			Phone:    "18655864568",
			Pwd:      "admin123",
			Nickname: "hahaha",
			Uname:    "hahaha",
		}
	})
	It("CreateUser", func() {
		// 这里会真的在数据库中创建
		ro.CreateUser(uD)
	})
	It("GetUserById", func() {
		user, err := ro.GetUserById(4)
		Ω(err).ShouldNot(HaveOccurred())
		Ω(user.Phone).Should(Equal("18655864568"))
	})
})
  • 目录结构
 1
 2
 3
 4
 5
 6
 7
 8
 9
10
11
12
13
14
➜  p15 tree .
.
├── biz
│   ├── biz_suite_test.go
│   ├── user.go
│   └── user_test.go
├── go.mod
├── go.sum
├── main.go
└── mock
    └── mrepo
        └── user.go

3 directories, 7 files
  • 执行测试
 1
 2
 3
 4
 5
 6
 7
 8
 9
10
11
12
13
14
15
16
17
18
19
➜  p15 go test  p15/biz/ -v
=== RUN   TestBiz
Running Suite: biz user test
============================
Random Seed: 1657254031
Will run 4 of 4 specs


2022/07/08 12:20:31 /mnt/g/Workspace/go/docker/p15/biz/user.go:58 record not found
[0.800ms] [rows:0] SELECT * FROM `users` WHERE `users`.`phone` = '18655864568' ORDER BY `users`.`id` LIMIT 1

2022/07/08 12:20:31 /mnt/g/Workspace/go/docker/p15/biz/user.go:68 SLOW SQL >= 200ms
[264.312ms] [rows:1] INSERT INTO `users` (`phone`,`pwd`,`nickname`,`uname`,`id`) VALUES ('18655864568','admin123','hahaha','hahaha',4)
••••
Ran 4 of 4 Specs in 0.274 seconds
SUCCESS! -- 4 Passed | 0 Failed | 0 Pending | 0 Skipped
--- PASS: TestBiz (0.27s)
PASS
ok      p15/biz 0.286s

本文参考

Go内联

  • 概念:在编译时,对于简短的函数,直接内嵌调用的代码,即直接展开代码,而不是将函数单独放进栈中
  • 目的:为了减少函数调用时的堆栈等开销

性能对比

  • 编写 inline_test.go ,在函数定义前一行添加 //go:noinline 可以禁止编译器内联
 1
 2
 3
 4
 5
 6
 7
 8
 9
10
11
12
13
14
15
16
17
18
19
20
21
22
23
24
25
26
27
28
29
30
31
32
33
34
35
36
37
package main

import (
	"testing"
	"time"
)

//go:noinline
func maxNoinline(a, b int) int {
	if a < b {
		return b
	}
	return a
}

func maxInline(a, b int) int {
	if a < b {
		return b
	}
	return a
}

func BenchmarkNoInline(b *testing.B) {
	x, y := 1, 2
	b.ResetTimer()
	for i := 0; i < b.N; i++ {
		maxNoinline(x, y)
	}
}

func BenchmarkInline(b *testing.B) {
	x, y := 1, 2
	b.ResetTimer()
	for i := 0; i < b.N; i++ {
		maxInline(x, y)
	}
}
  • 基准测试一下
 1
 2
 3
 4
 5
 6
 7
 8
 9
10
➜  p14 go test -bench='Inline$' -v inline_test.go 
goos: linux
goarch: amd64
cpu: Intel(R) Core(TM) i5-6200U CPU @ 2.30GHz
BenchmarkNoInline
BenchmarkNoInline-4     642340173                1.618 ns/op
BenchmarkInline
BenchmarkInline-4       1000000000               0.4066 ns/op
PASS
ok      command-line-arguments  1.696s
  • 禁止编译器内联也可以在测试的时候带上 -gcflags=all=-l 或者 -gcflags=-l 参数
 1
 2
 3
 4
 5
 6
 7
 8
 9
10
➜  p14 go test -gcflags=all=-l -bench='Inline$' -v inline_test.go 
goos: linux
goarch: amd64
cpu: Intel(R) Core(TM) i5-6200U CPU @ 2.30GHz
BenchmarkNoInline
BenchmarkNoInline-4     718661420                1.600 ns/op
BenchmarkInline
BenchmarkInline-4       727264352                1.616 ns/op
PASS
ok      command-line-arguments  2.679s

手动内联

  • 手动展开后的代码
 1
 2
 3
 4
 5
 6
 7
 8
 9
10
11
12
13
14
func BenchmarkInline1(b *testing.B) {
	x, y := 1, 2
	a := 0
	b.ResetTimer()
	for i := 0; i < b.N; i++ {
		if x < y {
			a = y
		} else {
			a = x
		}
	}
	b.StopTimer()
	fmt.Println(a)
}
  • 添加以下代码
 1
 2
 3
 4
 5
 6
 7
 8
 9
10
11
12
13
14
15
16
17
18
19
20
21
22
23
24
25
26

func BenchmarkNoInline1(b *testing.B) {
	x, y := 1, 2
	a := 0
	b.ResetTimer()
	for i := 0; i < b.N; i++ {
		a = maxNoinline(x, y)
	}
	b.StopTimer()
	fmt.Println(a)
}

func BenchmarkInline1(b *testing.B) {
	x, y := 1, 2
	a := 0
	b.ResetTimer()
	for i := 0; i < b.N; i++ {
		if x < y {
			a = y
		} else {
			a = x
		}
	}
	b.StopTimer()
	fmt.Println(a)
}
  • 测试校验
 1
 2
 3
 4
 5
 6
 7
 8
 9
10
11
12
13
14
15
16
➜  p14 go test -bench='Inline' -v inline_test.go 
goos: linux
goarch: amd64
cpu: Intel(R) Core(TM) i5-6200U CPU @ 2.30GHz
BenchmarkNoInline
BenchmarkNoInline-4     694474184                1.660 ns/op
BenchmarkInline
BenchmarkInline-4       1000000000               0.4273 ns/op
BenchmarkNoInline1
# ……
BenchmarkNoInline1-4    521572680                2.040 ns/op
BenchmarkInline1
# ……
BenchmarkInline1-4      1000000000               0.4184 ns/op
PASS
ok      command-line-arguments  4.058s

本文参考

分布式Mysql

大数据量下,数据库的性能优化

  • 常说的方向有水平拆分,垂直拆分;水平扩展,垂直扩展

垂直方向

  • 强调的是对于个体性能的优化

垂直扩展

  • 就是更换性能更强的服务器

垂直拆分

  • 在需求方面,设计一张表,即使满足了三范式,也可能分成经常使用的字段和不经常使用的字段,不经常使用的字段可以单独拿出来做一张附属表;
  • 对功能模块的划分,在表层面,比如,可以分成用户表,商品表之类的;这是在建表的时候就应该考虑好的东西;
  • 在数据库层面,创建独立的用户库,商品库;这是将功能进行细化。

水平方向

  • 强调的是对于资源的累计

水平扩展

  • 就是添加更多的服务器

水平拆分

  • 在表层面,对于一个有较好设计的表,在达到一定的数据量后,可以实行分区,分表操作;
  • 在数据库层面,可以实行分库操作;
  • 这些扩展的东西的业务功能是与原先一致的,字段是完全的一致的

优化大数据量的时机

  • 先是合理地设计每张表,做好查询缓存;
  • 然后是主从数据库,读写分离,一主多从,主库负责写,从库负责读;
  • 之后才是垂直方向,再是水平方向;

一些问题

跨节点连表,跨节点分页,跨节点聚合

  • 多次查询,取出所有数据,再进行查询排序等操作

全局唯一键

  • Twitter 的 Snowflake(又名“雪花算法”),这种方案把64-bit分别划分成多段,分开来标示机器、时间等
  • Redis生成ID,这主要依赖于Redis是单线程的,所以也可以用生成全局唯一的ID。可以用Redis的原子操作 INCR和INCRBY来实现。
  • zookeeper生成唯一ID,zookeeper主要通过其znode数据版本来生成序列号,可以生成32位和64位的数据版本号,客户端可以使用这个版本号来作为唯一的序列号。
  • 美团分布式ID生成开源项目:Leaf

分布式事务

选择更换数据库,那些本身就是分布式的数据库

Goroutine调度方式

关于GMP模型

  • 就很符合人类思考的一中设计吧;G负责发起,P负责安排,M负责执行
  • 1.1版本才有的P,使M可以专注于执行
  • 再加点工作窃取之类的技巧,压榨下cpu
  • work stealing 机制:当本线程无可运行的 G 时,尝试从其他线程绑定的 P 偷取 G,而不是销毁线程
  • hand off 机制:当本线程因为 G 进行系统调用阻塞时,线程释放绑定的 P,把 P 转移给其他空闲的线程执行
  • Go 调度本质是把大量的 goroutine 分配到少量线程上去执行,并利用多核并行,实现更强大的并发

调度方式

协作式

主动调度弃权:抢占标记

  • 在函数调用的序言插入抢占检测指令,若检测到标记,则主动中断执行,让出执行权利
可以被抢占的条件
  • 运行时没有禁止抢占(m.locks == 0)
  • 运行时没有在执行内存分配(m.mallocing == 0)
  • 运行时没有关闭抢占机制(m.preemptoff == “")
  • M 与 P 绑定且没有进入系统调用(p.status == _Prunning)
  • stackguard0 设置抢占标记 stackPreempt 的时机
Note
  • 进入系统调用时(runtime.reentersyscall,注意这种情况是为了保证不会发生栈分裂, 真正的抢占是异步的通过系统监控进行的)
  • 任何运行时不再持有锁的时候(m.locks == 0)
  • 当垃圾回收器需要停止所有用户 Goroutine 时
  • 存在问题:若协程中无函数,则无法设置抢占标记,也就无法被抢占
 1
 2
 3
 4
 5
 6
 7
 8
 9
10
11
12
13
14
15
// 此程序在 Go 1.14 之前的版本不会输出 OK
package main
import (
	"runtime"
	"time"
)
func main() {
	runtime.GOMAXPROCS(1)
	go func() {
		for {
		}
	}()
	time.Sleep(time.Millisecond)
	println("OK")
}

主动用户让权:Gosched

  • 使用示例
 1
 2
 3
 4
 5
 6
 7
 8
 9
10
11
12
13
14
15
16
17
18
19
20
21
22
23
package main

import (
	"fmt"
	"runtime"
)

func say(s string) {
	for i := 0; i < 5; i++ {
		runtime.Gosched()
		fmt.Println(s)
	}
}

func TestSched() {
	runtime.GOMAXPROCS(1)
	go say("world")
	say("hello")
}

func main() {
	TestSched()
}
 1
 2
 3
 4
 5
 6
 7
 8
 9
10
➜  p10 go run main.go
hello
world
hello
world
hello
world
hello
world
hello
  • 如果去掉 runtime.GOMAXPROCS(1) 或者 runtime.Gosched() 则打印不出来全部输出
Note
  • 若有多个P,则go出来的协程会挂到别的P上
  • 当只有一个P时,会通过循环中的 runtime.Gosched() 轮流让出 执行机会

抢占式

异步系统调用

  • 比如一个协程进行网络IO操作,会被当前的MP抛给netpoller
  • 在完成IO操作后,等待队列中的 G 会被唤醒,标记为可运行(runnable),并被放入到某 P 的队列中(抢P),绑定一个 M 后继续执行

同步系统调用

  • 比如文件 I/O,MG 会和P分离(P另寻M,抢M)
  • 当M从系统调用返回时,不会继续执行,而是将G放到run queue

被动 GC 抢占

  • 当需要进行垃圾回收时,为了保证不具备主动抢占处理的函数执行时间过长,导致垃圾回收迟迟不得执行而导致的高延迟,而强制停止 G 并转为执行垃圾回收

抢占信号的选取

  • 有关信号
  • preemptM 完成了信号的发送,直接向需要进行抢占的 M 发送 SIGURG 信号 即可
  • 为什么是 SIGURG 信号而不是其他的信号?如何才能保证该信号 不与用户态产生的信号产生冲突?是因为:
Note
  • 默认情况下,SIGURG 已经用于调试器传递信号。
  • SIGURG 可以不加选择地虚假发生的信号。例如,我们不能选择 SIGALRM,因为 信号处理程序无法分辨它是否是由实际过程引起的(可以说这意味着信号已损坏)。 而常见的用户自定义信号 SIGUSR1 和 SIGUSR2 也不够好,因为用户态代码可能会将其进行使用
  • 需要处理没有实时信号的平台(例如 macOS)
  • 考虑以上的观点,SIGURG 其实是一个很好的、满足所有这些条件、且极不可能因被用户态代码 进行使用的一种信号。

两个特殊的M

  • 一个名为 NetPoller 的 M 异步处理网络IO,它不需要和 P 进行绑定。当 G 执行网络 IO 的时候,G 会将当前 M 和 P 解绑,进入到 NetPoller 的 M 中,等待网络 IO 完成,这样即使执行网络 IO 的系统调用,也不会产生阻塞的 M.当网络 IO 完成后,M 的 Schedule 函数,会通过 findrunable函数 取到这个 G,继续运行它
  • 一个名为 sysmon 的 M的系统监控线程,它也不需要绑定 P 就可以运行(以 g0 这个 G 的形式),它的主要功能有:
Note
  • 检查死锁runtime.checkdead
  • 运行计时器 — 获取下一个需要被触发的计时器;
  • 将长时间未处理的 netpoll 结果添加到任务队列;
  • 向长时间运行的 G 任务发出抢占调度(retake 方法);Go 的抢占式调度当 sysmon 发现 M 已运行同一个 G(Goroutine)10ms 以上时,它会将该 G 的内部参数 preempt 设置为 true。然后,在函数序言中,当 G 进行函数调用时,G 会检查自己的 preempt 标志,如果它为 true,则它将自己与 M 分离并推入“全局队列”。由于它的工作方式(函数调用触发),在 for{} 的情况下并不会发生抢占,如果没有函数调用,即使设置了抢占标志,也不会进行该标志的检查。Go1.14 引入抢占式调度(使用信号的异步抢占机制),sysmon 仍然会检测到运行了 10ms 以上的 G(goroutine)。然后,sysmon 向运行 G 的 P 发送信号(SIGURG)。Go 的信号处理程序会调用P上的一个叫作 gsignal 的 goroutine 来处理该信号,将其映射到 M 而不是 G,并使其检查该信号。gsignal 看到抢占信号,停止正在运行的 G。
  • 打印调度信息,归还内存等定时任务.
  • 释放闲置超过 5 分钟的 span 内存;如果超过 2 分钟没有垃圾回收,强制执行;
  • 收回因 syscall 长时间阻塞的 P

本文参考

信号

信号

概念

  • 进程间通信方式之一
  • 信号是在软件层次上对中断机制的一种模拟,是一种异步通信方式
  • 信号可以直接进行用户空间进程和内核进程之间的交互,内核进程也可以利用它来通知用户空间进程发生了哪些系统事件

用户进程对信号的响应方式

  • 忽略信号:对信号不做任何处理,但是有两个信号不能忽略:即SIGKILL及SIGSTOP
  • 捕捉信号:定义信号处理函数,当信号发生时,执行相应的处理函数
  • 执行缺省操作:Linux对每种信号都规定了默认操作

区别于信号量

  • 信号量是一个计数器,可以用来控制多个线程对共享资源的访问,它不是用于交换大批数据,而用于多线程之间的同步.它常作为一种锁机制,防止某进程在访问资源时其它进程也访问该资源
  • 主要作为进程间以及同一个进程内不同线程之间的同步手段

kill命令

熟悉的使用是,停掉进程

1
2
3
kill pid
# 强制kill
kill -9 pid

那么9代表什么

  • 查看所有信号名称
1
2
➜  ~ kill -l
HUP INT QUIT ILL TRAP ABRT BUS FPE KILL USR1 SEGV USR2 PIPE ALRM TERM STKFLT CHLD CONT STOP TSTP TTIN TTOU URG XCPU XFSZ VTALRM PROF WINCH POLL PWR SYS
  • 查看对应的信号ID
1
2
➜  ~ kill -l INT
2
  • 向进程发送信号
1
➜  p10 kill -s USR1 pid

同类的命令

  • pkill,killall

golang signal使用示例

具体代码

 1
 2
 3
 4
 5
 6
 7
 8
 9
10
11
12
13
14
15
16
17
18
19
20
21
22
23
24
25
26
27
28
29
30
31
32
33
34
35
36
37
38
39
40
41
42
43
44
45
46
47
48
49
50
51
52
53
54
package main

import (
	"fmt"
	"os"
	"os/signal"
	"syscall"
)

func main() {
	TestSignal()
}

var firstSigusr1 = true

func TestSignal() {
	// 忽略 Control-C (SIGINT)
	// os.Interrupt 和 syscall.SIGINT 是同义词
	signal.Ignore(os.Interrupt)

	c1 := make(chan os.Signal, 2)
	// Notify SIGHUP
	signal.Notify(c1, syscall.SIGHUP)
	// Notify SIGUSR1
	signal.Notify(c1, syscall.SIGUSR1)
	go func() {
		for {
			switch <-c1 {
			case syscall.SIGHUP:
				fmt.Println("sighup, reset sighup")
				signal.Reset(syscall.SIGHUP)
			case syscall.SIGUSR1:
				if firstSigusr1 {
					fmt.Println("first usr1, notify interrupt which had ignore!")
					c2 := make(chan os.Signal, 1)
					// Notify Interrupt
					signal.Notify(c2, os.Interrupt)
					go handlerInterrupt(c2)
				}
			}
		}
	}()

	select {}
}

func handlerInterrupt(c <-chan os.Signal) {
	for {
		switch <-c {
		case os.Interrupt:
			fmt.Println("signal interrupt")
		}
	}
}

具体使用

  • 命令步骤
https://static.duan1v.top/images/e31850f52edf5d32f23829395d3ef82d.png
进程通信-发送信号
  • 命令明细
1
2
3
4
5
6
7
8
➜  p10 go build -o main main.go
➜  p10 ./main 
➜  p10 ps aux|grep "\./main"
➜  p10 kill -s INT 14143    
➜  p10 kill -s USR1 14143   
➜  p10 kill -s INT 14143 
➜  p10 kill -s HUP 14143    
➜  p10 kill -s HUP 14143

本文参考

多线程的一些思考

一些问题

  • 双核四线程中的线程与多线程编程中的线程是一种东西吗
  • 线程池预设的是完整的线程吗,可以预设多少,可以全部都并行吗
  • 协程是轻量化的线程,轻在哪

一些概念

  • 进程:是应用程序执行过程中指令的发起者,及资源的申请者;有完整的堆区,栈区,数据区,代码区
  • 线程:是CPU调度和分派的基本单位,线程也有自己的私有数据,比如栈和寄存器
  • 并行:强调的是多条指令开始执行的时间的一致性;执行开始时间的同时性;应与串行相对;描述软件的执行方式;如分布式服务
  • 并发:强调的是下一条指令开始执行的时间可以早于当前指令执行结束时间;执行过程的同时性;用来描述并行方式下的并发过程中产生的问题,如CAP

多核技术及超线程技术 (摘自百度百科 英特尔超线程技术 )

  • 英特尔® 超线程技术是一项硬件创新,允许在每个内核上运行多个线程。更多的线程意味着可以并行完成更多的工作
  • 超线程技术为每个物理处理器设置了两个入口─AS(Architecture State,架构状态)接口,从而使操作系统等软件将其识别为两个逻辑处理器。这两个逻辑处理器像传统处理器一样,都有独立的IA-32架构,它们可以分别进入暂停、中断状态,或直接执行非凡线程,并且每个逻辑处理器都拥有APIC(Advanced Programmable Interrupt Controller,高级可编程中断控制器)
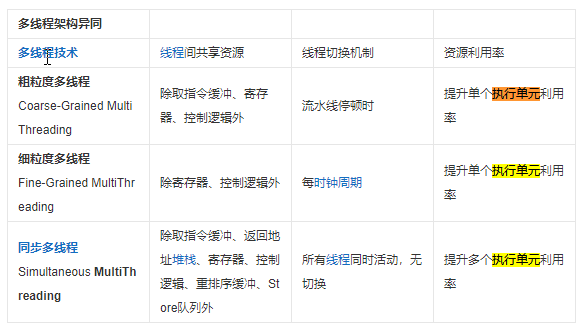
  • 多线程架构
    https://static.duan1v.top/images/20220702191306.png
    multi-process
  • SMT——Simultaneous MultiThreading SMT具有多个执行单元,可以同时运行多条指令,因此才叫做“同步多线程”!CMT和FMT都是在单个执行单元下的技术,不同的线程在指令级别上并不是真正的“并行”,而SMT则具有多个执行单元,同一时间内可以同时执行多个指令,因此前两者有时先归类为 TMT(Temporal MultiThreading,时间多线程),以和SMT相区分
  • 对于非SMT架构的CPU:超线程中的两个逻辑处理器并没有独立的执行单元、整数单元、寄存器甚至缓存等等资源。它们在运行过程中仍需要共用执行单元、缓存和系统总线接口。在执行多线程时两个逻辑处理器均是交替工作,假如两个线程都同时需要某一个资源时,其中一个要暂停并要让出资源,要待那些资源闲置时才能继续。因此,超线程技术所带来的性能提升远不能等同于两个相同时钟频率处理器带来的性能提升。可以说Intel的超线程技术仅可以看做是对单个处理器运算资源的优化利用。而双核心技术则是通过“硬”的物理核心实现多线程工作:每个核心拥有独立的指令集、执行单元,与超线程中所采用的模拟共享机制完全不一样。在操作系统看来,它是实实在在的双处理器,可以同时执行多项任务,能让处理器资源真正实现并行处理模式,其效率和性能提升要比超线程技术要高得多
  • Intel的HyperThreading超线程技术采用的是英特尔专有的同时多线程技术

一些思考

关于执行单元

  • 并行的基本条件是独立的执行单元
  • 概念
    https://static.duan1v.top/images/20220702155013.png
    multi-process

CPU层面的多线程

  • 将物理核心上的功能在软件上独立出来,有不同的架构,SMT则是有着多个执行单元;网传的厨师店员客户模型并不准确,对于SMT架构来说就是有多个厨师

多线程编程

  • 可以看出执行单元才是多线程的难点,多线程编程中,实例化的线程只是线程所需的上下文数据,也就是线程中的栈和寄存器等,所以这个和可用内存有关的,线程上下文实例完成后,需要等待执行单元执行
  • 这是对真正的执行单元的辅助,预加载上下文其实就是io层面进行优化

协程

  • 是轻量化的线程,它依旧需要线程去处理
  • 轻在什么地方?1个是寄存器,协程中只有1个Program Counter,还有两个寄存器Stack Pointer,Base Pointer,而线程中需要的比较多;2个是创建时候的初始栈内存,线程需要1M(64位是2M,线程还需要一个guard page,以划分其他线程),协程需要2k;3个是协程创建是用户级代码层面的,而线程是内核级的
  • 对比多线程编程中的线程,将执行函数所需的上下文进一步独立,以减少切换上下文的资源消耗

所有策略都是为了更好的压榨cpu,让cpu一刻不得闲

  • 多核或多线程相对于单核单线程,是有一个调度的优化,无需在长时间阻塞时一直等待,如io或复杂的计算;
  • 正是由于io问题,多线程编程才有可能提高cpu的利用率;
  • 如果是cpu密集型程序,需要多核并行处理才能提高效率。

本文参考