一步两步是魔鬼的步伐

Duan1v's Blog

Ubuntu常用命令

将文件A的内容写入到文件B中

  • cat A > B (追加的话, > 改成 >>)

  • sed -n ‘w B’ A

  • 效率对比

1
2
3
start=$(date +%s%N) && cat /tmp/784-35445384-1692024995-complete.json >> test.log && end=$(date +%s%N) && echo $((($end - $start) / 1000000))

start=$(date +%s%N) && sed -n 'w test.log' /tmp/784-35445384-1692024995-complete.json && end=$(date +%s%N) && echo $((($end - $start) / 1000000))
https://static.duan1v.top/images/20230816115547.png

查找内容

pattern和regex

Pattern
  • pattern指基本正则表达式(Basic Regular Expression,BRE)
  • pattern 是一种简化的正则表达式语法,通常用于基本的模式匹配。
  • pattern 可以包含普通字符、通配符和一些特殊字符,如 .、*、? 等。
  • pattern 不支持高级的正则表达式特性,如分组 ( )、选择符 |、定位符 ^ 和 $ 等。
Regex
  • regex 指扩展正则表达式(Extended Regular Expression,ERE)
  • regex 是正则表达式的完整语法,支持更广泛的模式匹配和高级特性。
  • regex 可以使用普通字符、元字符、量词、字符类、分组、引用等来定义复杂的模式。
  • regex 支持在模式中使用特殊字符和元字符进行更精确的匹配和操作。

vim test

1
2
3
4
5
6
7
8
John Doe 25 8900
Jane Smith 30 6200
David Johnson 23 3500
Mia Nguyen 56 4200
Mohammed Ali 45 5800
Olivia Kim 40 2300
Olivia Ali 34 550
David Kim 36 6000

grep

  • 示例
1
2
grep -i -n "d" test
grep -i -n -E "6$" test
https://static.duan1v.top/images/20230821093233.png
Tips
  • 使用 -E 选项可以启用regex,否则只支持pattern;
  • 使用 -n 选项可以在输出结果中显示匹配行的行号;
  • 使用 -i 选项可以忽略搜索时的大小写区分;
  • 使用 -r 选项可以递归搜索指定目录及其子目录中的文件。

awk

  • 示例
 1
 2
 3
 4
 5
 6
 7
 8
 9
10
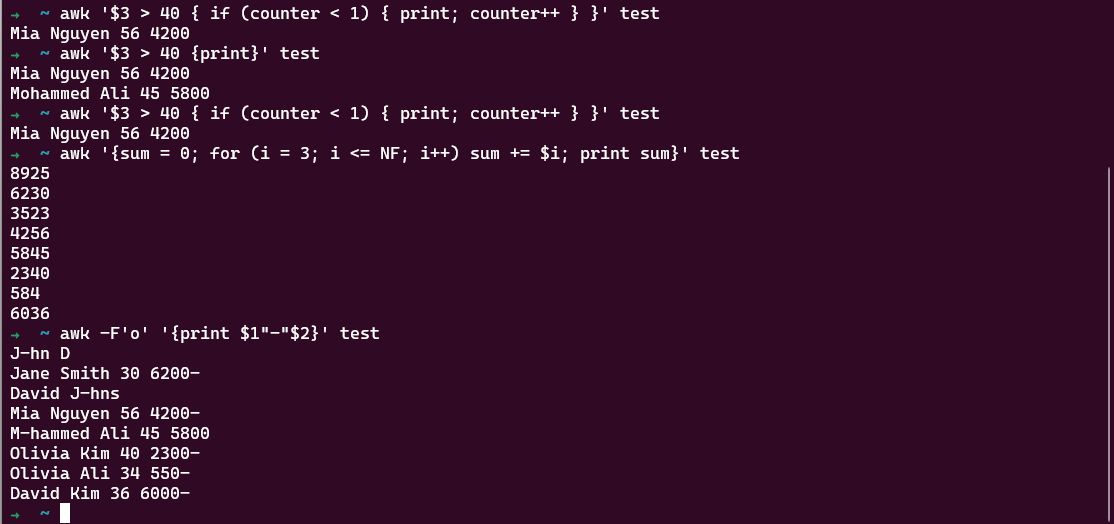
awk '{print}' test
awk '{print $2}' test
awk '{sum += $3} END {print sum}' test
awk '$3 > 40 {print}' test
awk '$3 > 40 { if (counter < 1) { print; counter++ } }' test # 只取满足条件的第一行
awk -F'o' '{print $1"-"$2}' test
awk '{if ($3 > 30) print "Large"; else print "Small"}' test
awk '{sum = 0; for (i = 3; i <= NF; i++) sum += $i; print sum}' test
awk '/^O/ {print}' test
awk '{gsub(/O|o/, "H"); print}' test # 将O或o,替换为H
https://static.duan1v.top/images/20230821100530.png
参考

新增SFTP用户

示例

  • 添加用户
1
2
3
4
sudo addgroup sftp_test_group
sudo useradd -g sftp_test_group -m sftp_test_user1
# 键入密码,生成密码:https://www.sexauth.com/
sudo passwd sftp_test_user1
https://static.duan1v.top/images/20230821111222.png
  • 可能用到的根据用户查询组内其他用户
1
2
3
groups sftp_test_user1
getent group sftp_test_group
awk -F":" '{print $1"|"$4}' /etc/passwd | grep -n -E "\|1003$"
https://static.duan1v.top/images/20230821111438.png
 1
 2
 3
 4
 5
 6
 7
 8
 9
10
11
sudo vim /etc/ssh/sshd_config
# 追加以下选项
AllowUsers sftp_test_user1
Match User sftp_test_user1
ChrootDirectory /var/sftp/sftp_test_user1
ForceCommand internal-sftp

sudo mkdir /var/sftp/sftp_test_user1
sudo chown -R sftp_test_user1:sftp_test_group /var/sftp/sftp_test_user1

sudo service ssh restart

Load data导入csv文件

场景

  • 数据量较大且需要较高的导入效率
  • mysqlimport本质就是对load data语句的封装
  • 本次使用的csv文件是50m,36w行,12列

具体实践

  • 创建数据表
 1
 2
 3
 4
 5
 6
 7
 8
 9
10
11
12
13
CREATE TABLE `my_user` (
  `id` int unsigned NOT NULL AUTO_INCREMENT,
  `name` varchar(255) CHARACTER SET utf8mb4 COLLATE utf8mb4_general_ci NOT NULL DEFAULT '',
  `age` tinyint NOT NULL DEFAULT '0',
  `email` varchar(255) CHARACTER SET utf8mb4 COLLATE utf8mb4_general_ci NOT NULL DEFAULT '',
  `country` varchar(255) COLLATE utf8mb4_general_ci NOT NULL DEFAULT '',
  `type` tinyint NOT NULL DEFAULT '0',
  `job` varchar(255) COLLATE utf8mb4_general_ci NOT NULL DEFAULT '',
  `brief` varchar(255) COLLATE utf8mb4_general_ci NOT NULL DEFAULT '',
  `created_at` datetime NOT NULL DEFAULT CURRENT_TIMESTAMP,
  `updated_at` datetime NOT NULL DEFAULT CURRENT_TIMESTAMP ON UPDATE CURRENT_TIMESTAMP,
  PRIMARY KEY (`id`)
) ENGINE=InnoDB DEFAULT CHARSET=utf8mb4 COLLATE=utf8mb4_general_ci;
  • 准备csv文件,可以使用Navicat自动填充数据,再导出成csv,我的csv名为 my_user.csv

  • csv文件中的列排序(注意比数据表中多了一列birthday)

https://static.duan1v.top/images/20230807201234.png
  • mysql的配置 /etc/mysql/mysql.conf.d/mysqld.cnf[mysqld] 选项添加配置,重启mysql
1
 secure-file-priv=/tmp
  • csv文件需要放在上面的目录(/tmp)下

  • sql语句

1
LOAD DATA INFILE '/tmp/my_user.csv' INTO TABLE my_user FIELDS TERMINATED BY ',' ENCLOSED BY '"' LINES TERMINATED BY '\n' IGNORE 1 LINES (@dummy,name,age,email,country,type,@dummy,job,@dummy,@dummy,@dummy,@dummy) SET brief='这个人很低调.';
  • 括号中的列需要和csv中的列一致(顺序和数量)
  • 将数据表中需要导入的列对应写在括号内,不需要导入的数据表的列,用 @dummy 占位
  • 使用SET 指定列(brief)的值
https://static.duan1v.top/images/20230807205432.png

关于将大号Excel转为CSV

  • 使用的是 libreoffice
1
libreoffice --version
  • 使用的命令是
1
cd /tmp && soffice --headless --convert-to csv:"Text - txt - csv (StarCalc)":"44,34,0,1,1/1" my_user.xlsx --outdir ./
  • python的Modin+Dask待研究

google api 授权及使用 总结

控制台中的操作

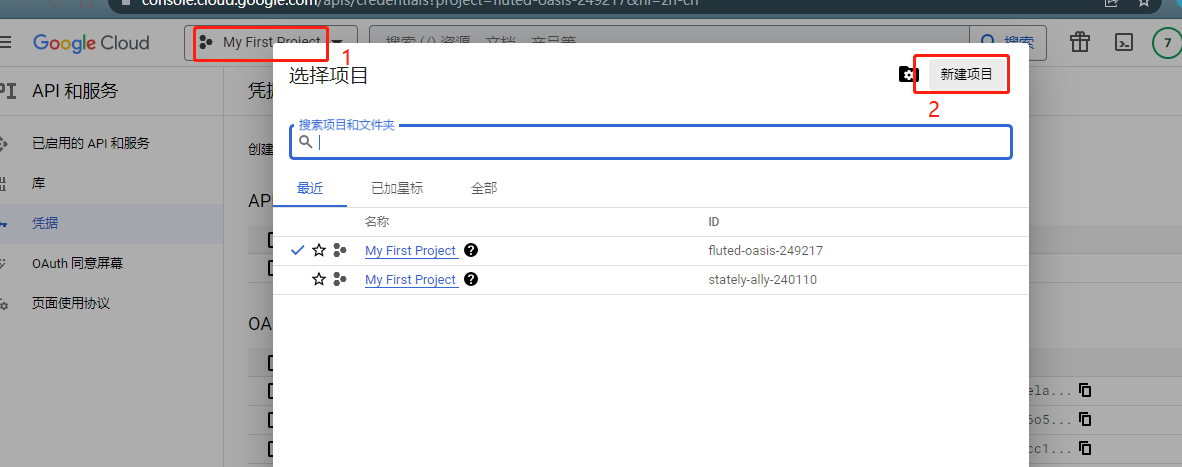
创建项目

https://static.duan1v.top/images/20230216223857.png

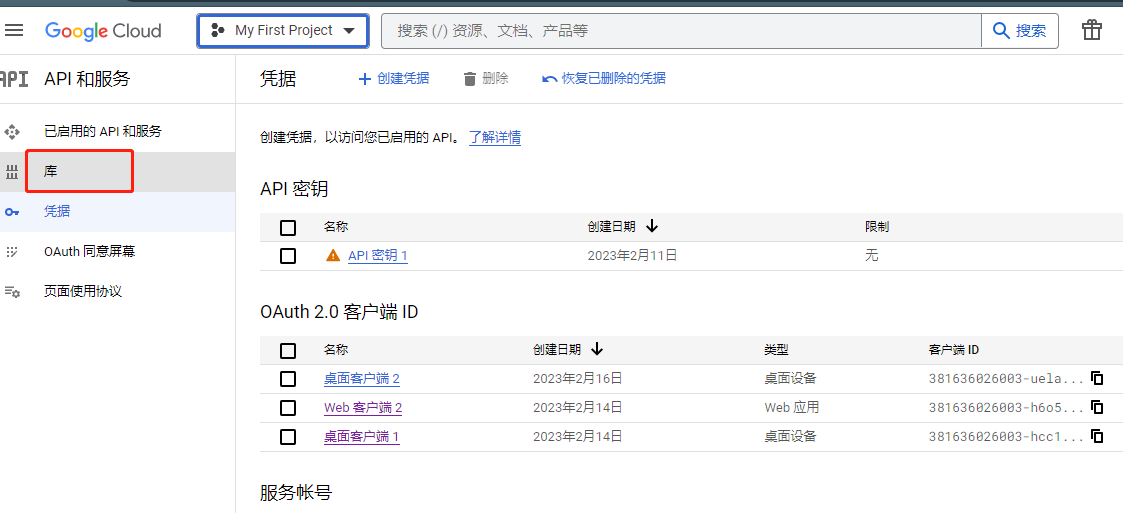
在库中选择需要的api,并启用

https://static.duan1v.top/images/20230216224808.png

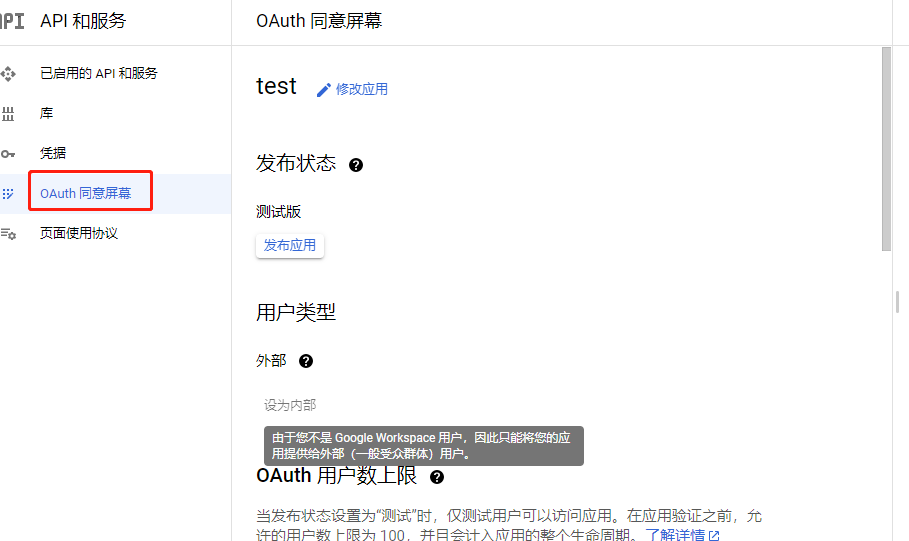
Oauth 同意屏幕配置授权应用基础信息及可调用接口范围

  • 个人账号只能配置为外部用户,需要配置测试用户及发布为正式应用;google suit的用户可以配置为内部用户
  • 第一页配置些应用的基本信息
  • 第二页配置的是授权后,应用内可以调用的接口
  • 个人账号只能配置为外部用户,需要配置测试用户,可以是自己的账号
https://static.duan1v.top/images/20230216225207.png

配置凭据

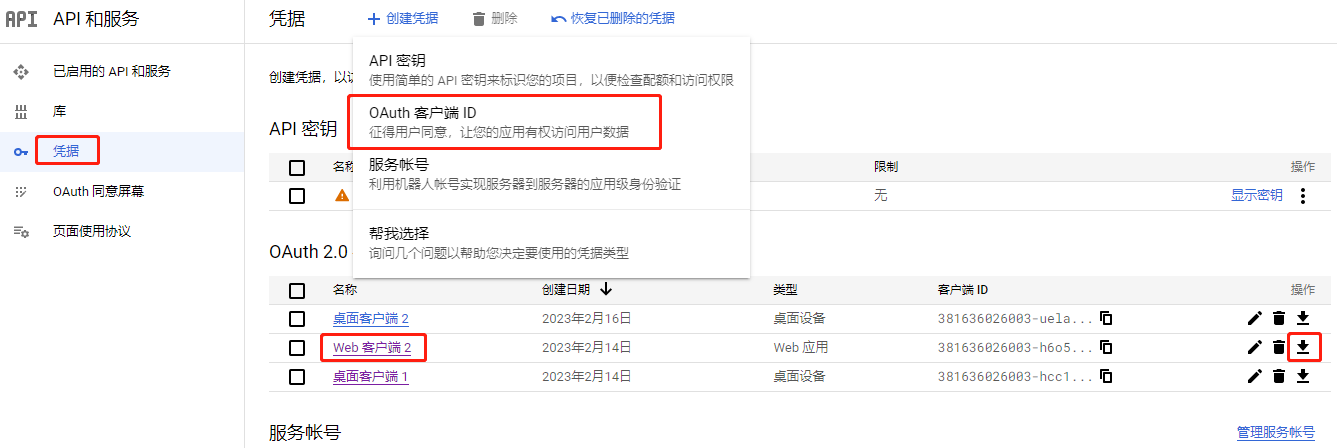
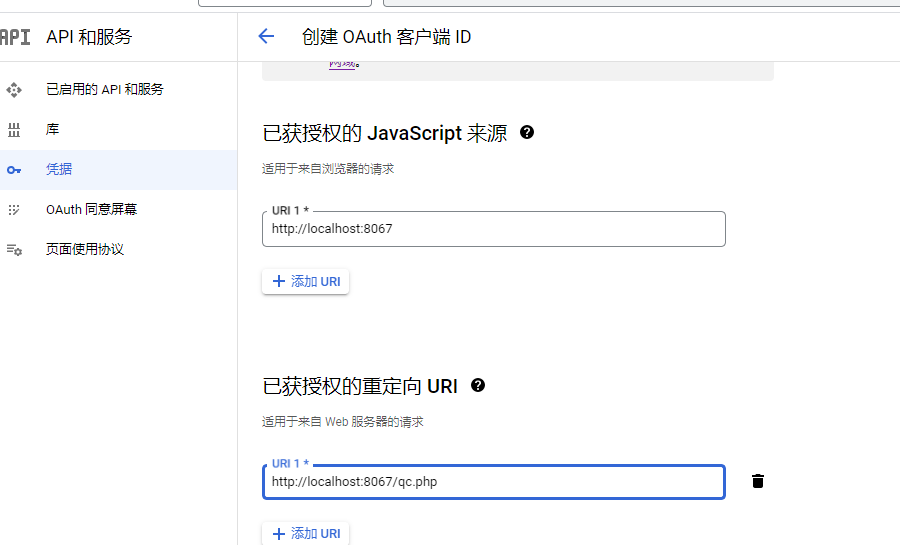
OAuth客户端授权

  • 需要通过下载的凭据生成授权跳转链接,获取code,生成token.json

  • 新建web应用类型的凭据,并配置授权完成后的跳转地址,可以写需要的授权那个页面地址,本地可以配置为localhost

  • 下载凭证

https://static.duan1v.top/images/20230216230330.png https://static.duan1v.top/images/20230217000810.png

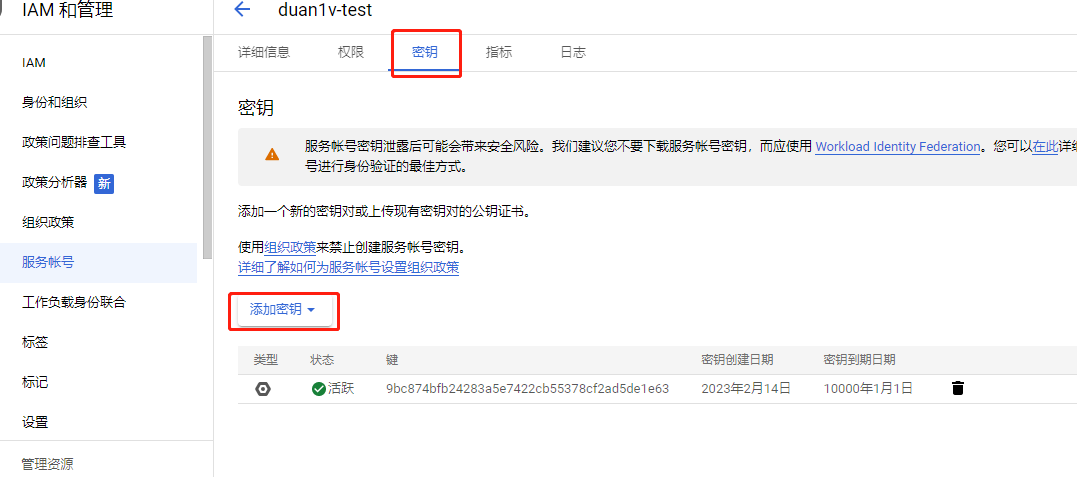
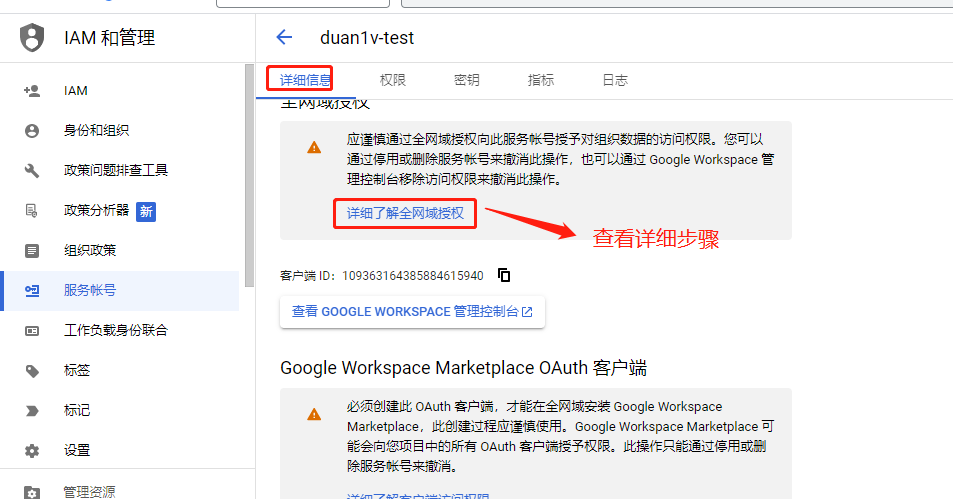
服务端授权

  • 本意是通过公私钥匹配,使应用中可以在服务端直接调用接口,无需进行授权交互

  • 创建完成后要继续编辑,添加密钥,及配置全网域(个人账号无法配置)

https://static.duan1v.top/images/20230216231734.png https://static.duan1v.top/images/20230216233017.png

测试用例

引入google api包

1
composer require google/apiclient:^2.12.1

使用凭据

客户端授权

 1
 2
 3
 4
 5
 6
 7
 8
 9
10
11
12
13
14
15
16
17
18
19
20
21
22
23
24
25
26
27
28
29
30
31
32
33
34
35
36
37
38
39
40
41
42
43
44
45
46
47
48
49
50
51
52
53
54
55
56
57
58
59
60
61
62
63
64
65
66
<?php

require __DIR__ . '/vendor/autoload.php';

use Google\Client;
use Google\Service\Gmail;

function getLabels()
{
    $client = new Client();
    $client->setApplicationName('Gmail API PHP Quickstart');
    $client->setScopes('https://www.googleapis.com/auth/gmail.readonly');
    $client->setAuthConfig("client_secret.json");
    $client->setAccessType('offline');
    $client->setPrompt('select_account consent');
    $tokenPath = "token.json";
    if (file_exists($tokenPath)) {
        $accessToken = json_decode(file_get_contents($tokenPath), true);
        $client->setAccessToken($accessToken);
    } else if ($authCode = $_GET["code"]) {
        // Exchange authorization code for an access token.
        $accessToken = $client->fetchAccessTokenWithAuthCode($authCode);
        $client->setAccessToken($accessToken);

        // Check to see if there was an error.
        if (array_key_exists('error', $accessToken)) {
            throw new \Exception(join(', ', $accessToken));
        }
        // Save the token to a file.
        if (!file_exists(dirname($tokenPath))) {
            mkdir(dirname($tokenPath), 0700, true);
        }
        file_put_contents($tokenPath, json_encode($client->getAccessToken()));
    }

    // If there is no previous token or it's expired.
    if ($client->isAccessTokenExpired()) {
        // Refresh the token if possible, else fetch a new one.
        if ($client->getRefreshToken()) {
            $client->fetchAccessTokenWithRefreshToken($client->getRefreshToken());
        } else {
            // Request authorization from the user.
            $authUrl = $client->createAuthUrl();
            header("Location: " . $authUrl);
        }
    }
    try {
        $service = new Gmail($client);
        // Print the labels in the user's account.
        $user = 'me';
        $results = $service->users_labels->listUsersLabels($user);

        if (count($results->getLabels()) == 0) {
            print "No labels found.\n";
        } else {
            print "Labels:\n";
            foreach ($results->getLabels() as $label) {
                printf("- %s\n", $label->getName());
            }
        }
    } catch (\Exception $e) {
        echo "Message: " . $e->getMessage();
    }
}

getLabels();
  • 页面授权
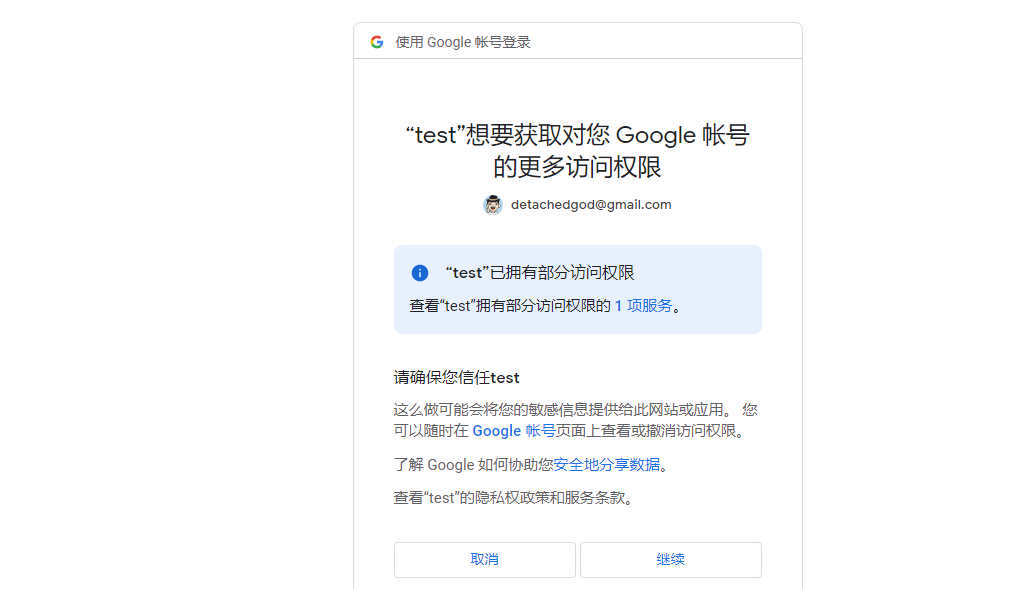
https://static.duan1v.top/images/20230217001106.png https://static.duan1v.top/images/20230217001518.png

服务端授权

1
2
3
$gmailService = new Google_Service_Gmail($client);

$labels = $gmailService->users_labels->listUsersLabels("me");
 1
 2
 3
 4
 5
 6
 7
 8
 9
10
11
12
13
14
PHP Fatal error:  Uncaught Google\Service\Exception: {
  "error": {
    "code": 400,
    "message": "Precondition check failed.",
    "errors": [
      {
        "message": "Precondition check failed.",
        "domain": "global",
        "reason": "failedPrecondition"
      }
    ],
    "status": "FAILED_PRECONDITION"
  }
}

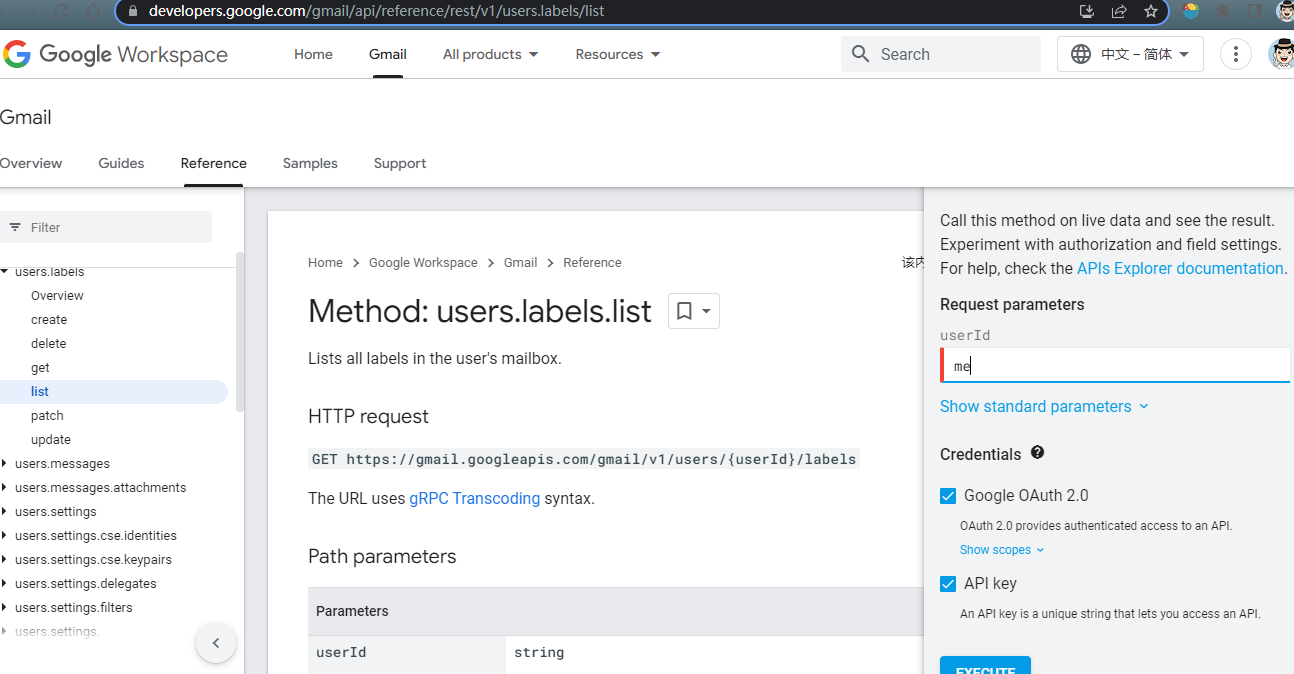
调试接口

https://static.duan1v.top/images/20230217005004.png

git相关

场景一

1
2
go env -w GONOPROXY=私有仓地址
go env -w GOPRIVATE=私有仓地址
  • 选择:SSH时,参考中可能有误,应如下替换
1
git config --global url."git@私有仓地址:".insteadOf "https://私有仓地址/"

场景二

1
git rebase -i {本次开发,自己第一次提交的前一次commit-id}

将除了第一行之外的所有 pick 改为 f, 保存退出

1
2
git rebase --continue
git push -f
  • git rebase -i

只能基于master分支,在自己本次的开发分支使用

只能合并日志,美化 git log 输出,每次提交还是能看到的

ps:更换编辑器命令 sudo update-alternatives --config editor

换行符警告

 1
 2
 3
 4
 5
 6
 7
 8
 9
10
$ git commit -am "XXXXXX。"
warning: LF will be replaced by CRLF in XXXXXX.
The file will have its original line endings in your working directory
warning: LF will be replaced by CRLF in XXXXXX.
The file will have its original line endings in your working directory
warning: LF will be replaced by CRLF in XXXXXX.
The file will have its original line endings in your working directory
warning: LF will be replaced by CRLF in XXXXXX.
The file will have its original line endings in your working directory
……
  • 解决
1
2
$ git config --global core.autocrlf false
$ git config --global core.safecrlf false

再写一些基础操作吧

获取别人刚才推的远程分支,需要先

1
git fetch

从master检出一个开发分支

1
git checkout -b some-dev origin/master

开发之后,发现分支选错了

  • 还未提交
1
2
3
git stash
git chekout {对的分支}
git stash pop # 或者 git stash apply
  • 已经提交,要在上面的步骤加上
1
git reset {该次提交的前一次commit-id} # 注意不要加上参数 --hard
  • 更改文件权限
1
2
git update-index --chmod=+x script.sh
# git update-index --chmod=+x *.sh
  • git解除对文件的版本控制
1
2
3
4
# 本地保留文件
git rm --cached test.txt 
# 删除本地文件
git rm --f test.txt

ssh使用代理登录及创建隧道

两种方式

  • 使用Xshell或者SecureCRT
  • 命令行

工具获取

  • 使用命令行时,windows需要connect.exe;linux需要netcat。后者下载方便,先提供前者下载链接(360会报有风险,我用着没事): connect.exe
  • 下载完成后放到 C:\Windows\System32 文件夹,或者自行配置环境变量

Xshell连接

先与普通ssh连接一样

再在 连接->代理 里点击 浏览->添加代理;注意选择代理的类型

隧道

  • 访问源端口,即可访问到目标端口;
  • 连接->ssh->隧道 里可直接添加;
  • 查看->隧道窗格->转移规则 中可看到隧道是否建立成功
  • PS:如果是有用WSL2,需要访问本地隧道端口,需要使用主机地址加端口

命令行

windows

  • 先找到ssh文件夹,我的是在

C:\Users\Administrator.ssh

  • 编辑 config 文件 ,替换掉中文部分;connect 命令中的参数 -S 是指定使用 socks 5 协议,也可以使用 -H 来使用 HTTP 协议来代理
1
2
3
4
5
6
7
Host 一个代号而已
HostName 需要ssh上去的那台服务器地址
User 用户名
Port 端口
PreferredAuthentications publickey
IdentityFile ~/.ssh/密钥文件
ProxyCommand connect -H 代理服务器的地址:端口 %h %p
  • 建立隧道(源端口:目标)
1
ssh -fNg -L 8084:127.0.0.1:9090 {config文件中的Host}

linux

  • 连接同上,ProxyCommand 命令改为,其中 nc 命令中的参数 -X 5 指定代理协议为 socks 5 ,如果是 socks 4 则写为 -X 4 ,如果是 HTTPS 代理则为 -X connect:
1
 nc -X connect -x 代理服务器的地址:端口 %h %p
  • 建立隧道(源:目标)
1
ssh -L localhost:8084:127.0.0.1:9090 -N -f {config文件中的Host}

参考

依赖注入和控制反转

Prerequisites

代码的作用

  • 程序是写给机器运行的,代码是写给人维护的

封装调用

  • 对于一个程序来说,完全可以写在一个文件中,且从头到尾,需要什么,都直接写,而非封装调用;也就是只通过各个语言编写最基础的cpu指令,比如加减、逻辑运算(或与非等)、流程控制(for|if等),连语言标准库中的函数都不事用
  • 也可以对于重复的代码进行封装,待需要的时候进行调用

优雅的代码

  • 在我看来,代码的优雅至少应该是:基于逻辑性强、可读性强的一种简洁;所以封装是必须的
  • 在封装调用中,就分成了调用方与模块(被调用方);调用方功能的实现是离不开模块的,也就是说调用方是依赖模块的
  • 如何调用这些依赖呢?

依赖注入(Dependency Injection)和控制反转(Inversion Of Control)

  • 在我看来,控制反转就是以细化功能为前提,降低调用方对模块的依赖,不用管模块的实现方式,达到模块自行控制的目的;
  • 依赖注入是控制反转的手段,常用的有构造方法入参,setter方法,这些都是一次性的,就是指不同的调用者调用不同的模块是没有什么优化的
  • 这些模块如果是经常被使用的,比如日志服务,那么这些调用就是属于重复操作了,可以再进一步封装,服务容器就是引入一个中间人,经常使用的那些模块先注册,调用方在用的时候直接获取就行了

laravel中的服务容器

  • laravel的服务容器就是Illuminate\Foundation\Application

常用的模块绑定到服务容器的方式

  • 绑定闭包
1
2
3
$this->app->bind('HelpSpot\API', function ($app) {
    return new HelpSpot\API($app['HttpClient']);
});
  • 绑定单例
1
2
3
$this->app->singleton('FooBar', function ($app) {
    return new FooBar($app['SomethingElse']);
});
  • 绑定实例
1
2
3
$fooBar = new FooBar(new SomethingElse);

$this->app->instance('FooBar', $fooBar);
  • 上下文绑定
1
2
3
4
5
$this->app->when('App\Handlers\Commands\CreateOrderHandler')
        ->needs('App\Contracts\EventPusher')
        ->give(function () {
          // Resolve dependency...
        });

常用的调用方式

1
2
3
4
5
6
7
8
$this->app->make('TestService');
// 或
$this->app['TestService'];
// 或
App::make('reports');
// 传参的话:
$this->app->makeWith(TestService::class, ['id' => 1]);
// 也可以来个facade直接调方法

laravel的服务容器在每一次解析对象时都会触发一个事件,可以使用resolving方法监听该事件

1
2
3
4
5
6
7
$this->app->resolving(function ($object, $app) {
    // 容器解析所有类型对象时调用
});

$this->app->resolving(function (FooBar $fooBar, $app) {
    // 容器解析"FooBar"对象时调用
});

本文参考